Alarm Manage Help
Windows
Alarm Manage Help
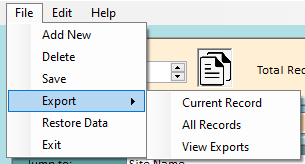
File Menu:
- Add New - Add a new record
- Delete - Delete the current record
- Save - Save record data
- Export - Export (or view previous exports of) records in CSV format
- Restore Data - Restore data from your last ten saves
- Exit - Quit the application
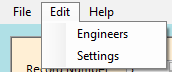

Edit Menu:
- Engineers - Configure your engineer names and email addresses
- Settings - Configure application settings
Help Menu:
- About - About this application
- Register - Register for up to 5,000 records
- Tell a friend - Tell a friend about this application
- Web Help - This webpage
Jump to:
- Allows you to quickly jump to a record based on Site Name or Job Number
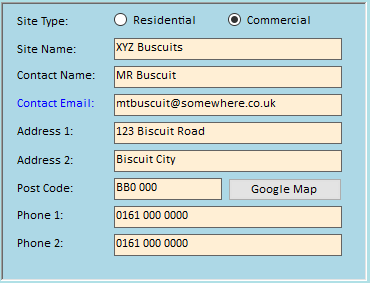
Site Details:
Enter the Site details.
The Google Map button will open Google Maps based on the entered Post Code.
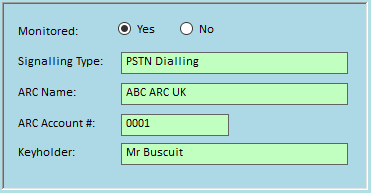
Monitored:
Fill in the Monitoring information here if applicable
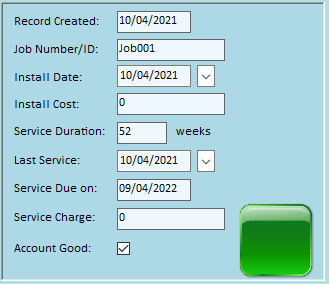
- Record Created - The date when the record was created
- Job Number/ID - Your own Job Number/ID for this installation
- Install Date - The date that the job was (or is going to be) installed
- Install Cost - A record of the install cost that appears on an invoice
- Service Duration - The service duration for this record in weeks
- Last Service - The last time this job was serviced
- Service Due on - Calculated from Last Service and Service Duration
- Service Charge - A record of the service charge for this job that appears on an invoice
- Account Good - This is simply a marker (displayed in red or green) as a quick indication
Here, you define which engineer has attended (or is going to attend) this job.
The [Email the assigned Engineer] button refers to this Engineer.

- Panel Type - The Panel type. Small icon to the left of this opens up a quick Panel selector to save you typing in
- Battery Type - The Panel battery
- Serial Number - The Panel serial number
- Wireless Batteries - The types and quantity of Wireless batteries for this system. This information can also appear on an invoice.
- Cloud Connected / Connected by - Select as appropriate
- MAC Address - The MAC Address of the IP Device that connects it to the internet
- SIM Number - If fitted with a SIM, the SIM number.
- Takeover - A marker that denotes if this is a takeover or not
- Reset Method - The reset method that is required upon a lockout

Everybody has files stored in a folder for a job.
Here, you can define the folder that contains the files/docs for this job and click one button to open that folder.

Everybody needs notes. Enter your notes here.
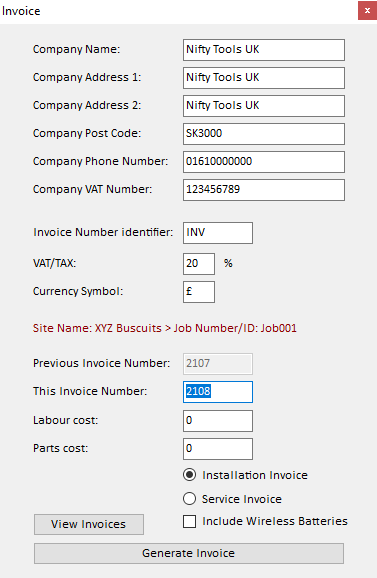
Invoice Creation:
Here, for the first time, enter your company details.
If you have no VAT number, leave it blank, so that it will not appear on the invoice.
Choose your preferred invoice designator (INV or whatever your like).
Enter your currency symbol.
The above details will be saved for next time.
You can change the 'This Invoice Number' if you wish. The next invoice will start one after the number in this field.
Labour cost and Parts cost - Enter costs in here (for this job) that will be used on the invoice.
Select if this will be an Installation invoice or Service invoice.
Decide whether you would like the Wireless Batteries field included on the invoice.